|
Plaiting
Corn Dollies and Harvest Knots Weaving,
fingerwork, busy fingers three dimensions and optical illusions of movement
turned from a flat straw-plaiting is a direct
connection to the Celtic Spirit and produces an organic artwork which is
virtually independent of time place and of
material restrictions. Corn dollies made from wheat what the peoples of
the British Isles call “corn” have deep pagan symbolic roots .The
harvest knot for men has no seeds but the
woman’s knot has them intact- its about fertility and the wonder of the
harvest and thanksgiving. Perhaps the best known “corn” sculpture
is the old hag or cailleach which is constructed
from the last sheaf to be harvested. It is blessed
and carried by the lucky person who harvested it
fore it is to give them good luck. Through time much
of the pagan meanings have been forgotten, yet , the designs and the
activity of plaiting persisted. Today harvest knots are made into jewelry-
beautiful gifts for friends. And the designs and
the craft- the very activity itself - timeless- continues to delight the
crafter as much as the observer .Plaiting begins with a simple pattern known as the two plait which is also known as
“cat stairs”. From completed two plaits one can braid ever
more complex harvest knots and corn dollies of all sorts. Then with the
concept mastered it is with a little practice that you will move on to
the more complex plaits and designs. You can do plaiting everywhere- the materials
are all around you growing wild in nature or as simply found as a scrap
of paper. (I always send my wife to church on palm Sunday for extra
palm fronds). For my classes- and for beginners I recommend a half inch
wide and two yard long piece of wallpaper. In minutes you will have a wonderful dolllie ready to present to your sweetie on the way to the fair! I provide instructions below for doing a two
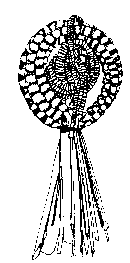
plat and to the right you will find illustrations of famous Irish corn
dollies and knots. Take a moment to look up a few of the references
cited below. Enjoy your encounter with the ancient rhythms
of Celtic antiquity- give your fingers a good time!-they deserve it!
For materials click here for instructions
click here
Materials:
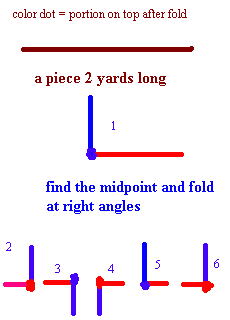
1. Before platting dampen straws so that they will be pliable. Place the straw in a tub of lukewarm water for 20 -30 minutes. Keep the straw under the water so it is uniformly wet. Put the straw in a damp towel so it does not dry out. Be careful! If you leave straw wet it will mildew and spoil. Only dampen or “temper” the materials that you need. Of course with paper or alternative materials you will not need dampening. 2. To make a two plat lay the strip of paper out lengthwise in front of you flat on the work surface. 3. Find the center of the strip 4. Fold the strip so that it forms a right angle
at
5. You will notice that one of the arms of the L is under. The other. Fold that arm perpendicularly over the other. 6. That makes the other arm of the L under. Fold it then over the other. 7. Repeat, always folding the arm that is under over the arm that is under. Be sure to grasp the corner firmly and hold tight. Do this until the material is used up. 8. When you are finished folding you will have a squarewith two ends. Pull each end from the other rotating slightly to reveal the design. Now secure the ends and present your ancient Celtic
knot to your sweetie- and celebrate the thanksgiving of the harvest the
right way! Sources:
Lettice Sandford,Straw Work and Corn Dollies Joan Rendell, Your Book of Corn Dollies. Kevin Danaher,The Year in Ireland.
Back to the top of this page click here How did you do? Let
me know!
|

Harvest Knot Donegal
Harvest Cailleach County Leix
|


